Teensy tutorial : SD Card
Teensy tutorial : SD Card
in this tutorial I will talk about how to connect SD card module with Teensy 3.1/3.2.
SD Card use SPI protocol , and as many application we can use SD arduino library.
you need to note that Teensy has 2 SPI ports and teensy SPI clock is faster than arduino SPI clock, so try to use CPU frequency of 24MHz in the beginning.
also for some SD card module like what i use in this tutorial , you must power it from 5V because it has a level shift IC , don't connect it with 3.3V it won't work !.
all you need to do this experiment is:
1- Teensy 3.1/3.2
2- SD Card Module
3-Wires
4-breadboard
Schematic:
Code:
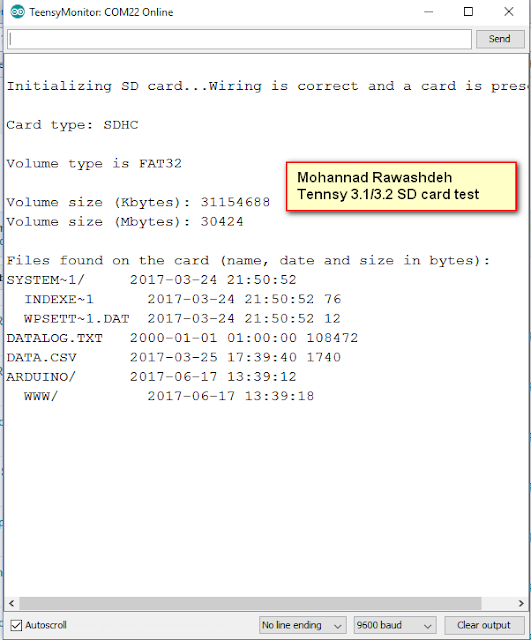
this is a simple code to check if your connection is correct and to read the SD card info , Download the code from HERE
/*
/*
 * Teensy 3.1 simple SD card code
 * visit my website for schematic and more
 * http://mb-raw.blogspot.com/2017/06/teensy-tutorial-sd-card.html
 * mb-raw.blogspot.com
 *
 created  28 Mar 2011
 by Limor Fried
 modified 9 Apr 2012
 by Tom Igoe
 */
 // include the SD library:
#include <SD.h>
#include <SPI.h>

// set up variables using the SD utility library functions:
Sd2Card card;
SdVolume volume;
SdFile root;

// change this to match your SD shield or module;
// Arduino Ethernet shield: pin 4
// Adafruit SD shields and modules: pin 10
// Sparkfun SD shield: pin 8
// Teensy audio board: pin 10
// Teensy 3.5 & 3.6 on-board: BUILTIN_SDCARD
// Wiz820+SD board: pin 4
// Teensy 2.0: pin 0
// Teensy++ 2.0: pin 20
const int chipSelect = 10;

void setup()
{
  //UNCOMMENT THESE TWO LINES FOR TEENSY AUDIO BOARD:
//  SPI.setMOSI(7);  // Audio shield has MOSI on pin 7
 // SPI.setSCK(14);  // Audio shield has SCK on pin 14

 // Open serial communications and wait for port to open:
  Serial.begin(9600);
 // SD.begin(chipSelect);
   while (!Serial) {
    ; // wait for serial port to connect. Needed for Leonardo only
  }


  Serial.print("\nInitializing SD card...");


  // we'll use the initialization code from the utility libraries
  // since we're just testing if the card is working!
  if (!card.init(SPI_HALF_SPEED, chipSelect)) {
    Serial.println("initialization failed. Things to check:");
    Serial.println("* is a card inserted?");
    Serial.println("* is your wiring correct?");
    Serial.println("* did you change the chipSelect pin to match your shield or module?");
    return;
  } else {
   Serial.println("Wiring is correct and a card is present.");
  }

  // print the type of card
  Serial.print("\nCard type: ");
  switch(card.type()) {
    case SD_CARD_TYPE_SD1:
      Serial.println("SD1");
      break;
    case SD_CARD_TYPE_SD2:
      Serial.println("SD2");
      break;
    case SD_CARD_TYPE_SDHC:
      Serial.println("SDHC");
      break;
    default:
      Serial.println("Unknown");
  }

  // Now we will try to open the 'volume'/'partition' - it should be FAT16 or FAT32
  if (!volume.init(card)) {
    Serial.println("Could not find FAT16/FAT32 partition.\nMake sure you've formatted the card");
    return;
  }


  // print the type and size of the first FAT-type volume
  uint32_t volumesize;
  Serial.print("\nVolume type is FAT");
  Serial.println(volume.fatType(), DEC);
  Serial.println();

  volumesize = volume.blocksPerCluster();    // clusters are collections of blocks
  volumesize *= volume.clusterCount();       // we'll have a lot of clusters
  if (volumesize < 8388608ul) {
    Serial.print("Volume size (bytes): ");
    Serial.println(volumesize * 512);        // SD card blocks are always 512 bytes
  }
  Serial.print("Volume size (Kbytes): ");
  volumesize /= 2;
  Serial.println(volumesize);
  Serial.print("Volume size (Mbytes): ");
  volumesize /= 1024;
  Serial.println(volumesize);


  Serial.println("\nFiles found on the card (name, date and size in bytes): ");
  root.openRoot(volume);

  // list all files in the card with date and size
  root.ls(LS_R | LS_DATE | LS_SIZE);
}


void loop(void) {

}
Now if you are looking to some cool feature you can use with it , let's think about IOT "internet of things " like esp8266 and WiFi Modules , you can set the name "SSID" and the password of your network and call it from the SD card , that's will allow you to edit the Network setting without re-programming the teensy , just modify the TXT file on the sd card.
you need to create a txt file on the sd card called (info) and write the SSID and the Password as you see in the picture below
the same connection and you can download the code from HERE
/*
/*
 * Teensy 3.1SD card read Wifi seetings code
 * visit my website for schematic and more
 * http://mb-raw.blogspot.com/2017/06/teensy-tutorial-sd-card.html
 * mb-raw.blogspot.com
 * written by: Mohannad Rawashdeh
  */
#include <SD.h>
#include <SPI.h>
char ssid[16]={};
char Password[16]={};
const int chipSelect = 10;
int WhatToread=0;// 1 to read SSID , 3 to read PASS
void setup() {
 Serial.begin(9600);
   while (!Serial) {
    ; // wait for serial port to connect. Needed for Leonardo only
  }


  Serial.print(" SD card...");

  // see if the card is present and can be initialized:
  if (!SD.begin(chipSelect)) {
    Serial.println(" failed, or not present");
    // don't do anything more:
    return;
  }
  Serial.println(" Ready");
   if (SD.exists("INFO.TXT"))
   {
     Serial.println("Info.txt exist.");
   }
   else
   {
    Serial.println("Info.txt doesn't exist.");
 //   return;
   }
  Serial.println("reading the SSID and Password ");
  File SdCradFile = SD.open("INFO.TXT");
  int counter=0;
  while (SdCradFile.available())
    {
      // first read until you reach to comma
      char c=SdCradFile.read();
      if(c==',')
      {
        WhatToread=2;
        counter=0;
        Serial.println(" ");
      }
      else if(c==':')
      {
       WhatToread++;
      }
      else
      {
        if(WhatToread==1)// SSID
        {
          ssid[counter]=c;
          Serial.write(c);
          counter++;
        }
         if(WhatToread==3)// PASS
        {
          Password[counter]=c;
          Serial.write(c);
          counter++;
        }
      }
    }
    // close the file:
    SdCradFile.close();
    Serial.println(" \n -------------------------");
    delay(1000);
    Serial.print("SSID:");
    Serial.println((char*)ssid);
    Serial.print("PASS:");
    Serial.println((char*)Password);

}

void loop()
{


}


Thanks for sharing this because currently am working on it. and it helps me a lot. but how about playing audio from this SD card module using speaker.
ReplyDeletefor arduino pin 9 is speaker pin . what about teensy? where i get the code also.
please help me
no work for me :(
ReplyDelete